This week’s installment of Strength in Knowledge is Part 3 of a 3-part series on foam rolling.  Part 1 discussed the theory behind foam rolling.  Part 2 covered how to safely foam roll.  This final installment will highlight a few popular foam rolling techniques.

Disclaimer: Please ensure that you have read Part 2 of the 3-part series on foam rolling prior to trying these techniques.  Part 2 was featured in The Leduc Rep and can also be found online at rxphysiotherapy.com/blog 

Additionally, if you are unsure if foam rolling is right for you, if you have osteoporosis, difficulty getting on and off of the floor independently, or have sustained a recent injury, please consult with a healthcare professional before trying these.

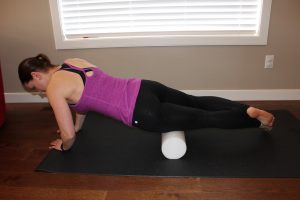
Quadriceps (Front of Thighs)

Roll the front of your thighs from the crease of your hip down to (but NOT over) your kneecaps.  You can do both legs at once, or for more pressure, you can cross over at the ankle and just roll one at a time (as shown).  Remember to keep breathing and sink into the foam roller as you roll slowly back and forth for 1-2 minutes.


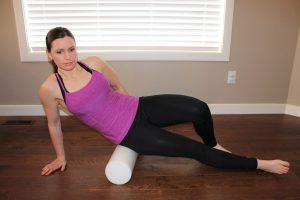
Glute med and min (Upper side of Buttock)

Roll the side of your buttock (glute med and min) from just above the hip bone to the top of the pelvic bone.  Take care NOT to roll over the hip bone (located at the widest part of your hips) to avoid rolling over the trochanteric bursa that resides there. 

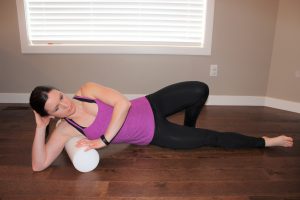
Lat dorsi and posterior shoulder (the back border of your armpit)

Roll the muscles that make up the back border of your armpit (the lats and posterior shoulder muscles) which can wreck havoc on the shoulder girdle.  You can do this with your elbow bent or straight – whichever is more comfortable.

These are just a few of the techniques that utilize a foam roller.  There are several more, in addition to many other self myofascial release options using other myofascial tools such as spiky balls, Yoga Tune Up balls, Pilates balls, hand held rollers and more.  Patient instruction in these techniques, when appropriate, is one of the many services provided to empower our patients at RX Physiotherapy.  Get in touch if you want to learn more!

Teresa Waser is a physiotherapist and owner of RX Physiotherapy.  She has a Master of Science in Physical Therapy from the University of Alberta, in addition to several years of continuing education and experience treating patients of all ages.  Outside of the clinic, she coaches running and CrossFit and is passionate about helping others live life to the fullest.  You can find more about Teresa and how she can help you at rxphysiotherapy.com


This week’s installment of Strength in Knowledge is Part 2 of a 3-part series on foam rolling.  Part 1 discussed the theory behind foam rolling.  This week, we will discuss how to safely foam roll.  The final installment will highlight a few of the most popular foam rolling techniques.

Foam rolling has been called the “poor man’s massage therapist” as it’s free, aside from the initial cost of a foam roller – which will set you back around $20-30.  You just need to know what you’re doing.

With foam rolling, we want to use long sweeping strokes, making sure to maintain normal breathing and keep your muscles relaxed.  Make sure not to roll too fast and try to allow the foam roller to sink into your tissues.  If you find areas of your muscles that are tighter than the surrounding area, you can spend some time focussing there, trying to coax the muscle tension to take a hike.  Typically, as a guideline, I suggest rolling for 1-2 minutes per muscle group, once daily, focussing on quality rolling and listening to your body. 

Foam rolling is typically uncomfortable – just as a deep tissue massage would be.  However, it should not be outright painful.  If you find that you cannot maintain normal breathing and keep the muscles relaxed while rolling, then you need to reduce the amount of pressure you are using.  There are a number of ways to do this – increasing the surface area of your body that is in contact with the roller, offloading how much weight you are putting into the roller, and using a handheld roller rather than a foam roller are just a few of the ways this can be done.  Additionally, I often suggest working on areas around the tight, tender region with the intent of “feeding slack” to the tight region, prior to directly working on that area.

Foam rolling is relatively safe, assuming common sense is employed.  However, there are some key safety considerations.  First, don’t roll over bony bits or joints – just stick to the muscle bellies.  Second, never do this is you have recently injured the area, particularly in the first 48-72 hours.  If you have strained or torn the tissue, you don’t want to possibly cause further damage.  To be on the safe side, if you have injured an area, wait until after your healthcare professional gives you the go-ahead before starting or resuming foam rolling in the injured region. 

Keep in mind that after foam rolling you should feel better and, although the tissue may be a bit tender to touch, you should not be in more pain.  Additionally, it should not cause bruising.  If you are in more pain afterwards or notice any bruising later on, this could indicate that either you were too aggressive with your rolling or you were working on a tissue that you shouldn’t have been (i.e. injured or really unhealthy tissue).  Finally, foam rolling should never cause any feelings of tingling, numbness or electric, shooting pain.  If you feel any of these, stop rolling on the area you are working on.  As rule, we want to avoid any deep pressure over nerves and avoid rolling over any irritated nerves.

If you feel uncertain as to whether foam rolling is right for you, or want to learn specific techniques that would be best for you, please feel free to reach out to me! 

Teresa Waser is a physiotherapist and owner of RX Physiotherapy.  She has a Master of Science in Physical Therapy from the University of Alberta, in addition to several years of continuing education and experience treating patients of all ages.  Outside of the clinic, she coaches running and CrossFit and is passionate about helping others live life to the fullest.  You can find more about Teresa and how she can help you at rxphysiotherapy.com

This week’s installment of Strength in Knowledge is Part 1 of a 3-part series on foam rolling.  This week we will discuss the theory behind this practice.  Next, we will discuss how to safely foam roll.  The third article will highlight a few of the most popular foam rolling techniques.

Perhaps you have been in the gym and have seen someone on the ground, rolling around on a big foam roller, typically grimacing.  Or perhaps your physiotherapist has already introduced you to this technique.  Alternatively, if you have been living under a rock for the past several years, you may have never even heard of foam rolling before.  If that’s the case, no problem – better late to the party than to never show up at all.

Foam rolling has been around for well over a decade and, nowadays, foam rollers are a ubiquitous feature commonly found in fitness facilities, physiotherapy clinics and homes all over.  So, what’s all the hype about?  And why would you ever want to do such a thing?!

Foam rolling is one form of self myofascial release – a manual therapy technique that you perform on your own body, in the hopes of positively impacting your fascial system, neuromuscular system (your nerves and muscles) as well as the local circulatory system (the blood flow to the tissues). 

Research in the area of self myofascial release is not extensive.  Not all studies are of high quality and there are some conflicting results.  More work is needed, but a 2015 systematic review (Cheatham et al.), which pooled the results of the high-quality studies that had been performed to date, concluded that self myofascial release, using a foam roller or handheld roller, appears to be effective for enhancing range of motion (mobility) and pre and post exercise muscle performance.

Basically, foam rolling is believed to reduce muscle tension, improve range of motion, and improve local blood flow.  Additionally, some studies have demonstrated that post-exercise foam rolling can reduce the intensity and duration of delayed-onset muscle soreness following exercise (the stiffness and soreness that you may feel in your muscles after a workout).  Furthermore, it provides an opportunity for you to map out areas of restriction in your body.  Clinically, we often see that changes in our range of motion and increased muscle tension precede painful symptoms and this can allow us to address these changes before they become real problems.  For instance, if the tissues at the back of the shoulder start getting really tight, this can affect how the shoulder is moving and can eventually lead to shoulder pain.  If we are foam rolling and we identify and treat this tightness early, we may be able to avoid this leading to a painful shoulder.  In the event the shoulder has already become painful, depending on the issues present, application of appropriate techniques can aid in recovery, ideally in conjunction with suitable therapeutic exercises.

The next installment of this series on foam rolling will cover how to do so safely.  Stay tuned!

Teresa Waser is a physiotherapist and owner of RX Physiotherapy.  She has a Master of Science in Physical Therapy from the University of Alberta, in addition to several years of continuing education and experience treating patients of all ages.  Outside of the clinic, she coaches running and CrossFit and is passionate about helping others live life to the fullest.  You can find more about Teresa and how she can help you at rxphysiotherapy.com